TurtleNet 6: Network Attached Storage (NAS)
What is a NAS and why should I care?
Whether it be photos, videos, music, or important documents, you most likely have a bunch of files scattered around your computer. Maybe you have an external hard drive if you ran out of space, and maybe you also back up your most important files on a cloud storage provider like Google Drive.
In an ideal world, we wouldn't have to worry about backups or capacity: we'd just have an infinite amount of indestructible cloud storage at our disposal! But realistically, this would cost a fortune (in fact, this exact need funnels billions of dollars into Google, Amazon, Microsoft, etc. every day)...
Luckily, we have a server now so we can just become our own cloud storage provider at a fraction of the price! As long as you can buy some hard drives and pay the electricity cost, you'll have as much storage as you'd like, available anywhere you can get an internet connection. Hosting this service is called Network Attached Storage, often referred to as NAS (or "a NAS", if talking about the hardware itself). "NAS" is pronounced in the same manner as the famous rapper.
Hosting a NAS has many benefits over cloud storage or shoving an old hard drive enclosure into the back of your closet:
Price: If you need anything more than a few hundred GB, cloud storage can get prohibitively expensive: for example, 5TB of Google Drive storage costs $250 per year- enough to buy a 14TB hard drive!
Speed: Since you'll be hosting your storage inside your home, network speed and latency won't be a concern. NAS performance is almost always bottlenecked by your drives' read/write speeds.
Security: Another benefit of self-hosting your storage is that you don't have to worry about uploading your sensitive personal data onto someone else's server (especially if that someone is notorious for selling your data... cough cough Google)
Availability: You can mount your NAS and access it just like it were physically attached to your computer at all times. This means you effectively have server-grade storage capacity on your phone, Raspberry Pi, or thin ultrabook!
Sharing: If any of your friends or family want to join in, you can easily share your files with them, or give them their own private storage pool.
An Intro to RAID and ZFS
Unfortunately, creating a NAS is not quite as easy as plugging a whole bunch of disks into your server. Let's say you have five 4TB drives: how would you combine all of them to get 20TB of storage space? And what happens if one of those drives fails?
These are huge problems for datacenters, which often have thousands of drives that need to be continuously monitored and replaced before failures create unrecoverable data loss. There have been lots of solutions proposed, which mostly fall under the RAID (Redundant Array of Inexpensive Disks) umbrella.
Basically, the idea is that the chance of failure increases proportionally with the number of disks we have in our NAS- but since we have multiple drives, we can store multiple copies of our data such that if any one hard drive fails, we can look up the redundant copies stored in other drives to recover that data.
Different RAID configurations are designed to provide options for the tradeoff between storage and redundancy: the more backups we store, the less likely we are to lose our data but at the cost of taking away storage space from the data pool itself.
RAID Basics
RAID configurations are specified with a number. Check out the Wikipedia page for a full list, but the most commonly used configurations are:
RAID 0: Your files are spread across all drives ("striping"), and no backups are created. This means that the capacity and throughput of your drives are maximized, but if any one drive fails you will lose all of your data. This is very dangerous and should not be considered for any serious NAS setup (unless you know exactly what you're doing and have backups)!
RAID 1: Your files are "mirrored" to all drives, such that each drive holds exactly the same data. This means you can lose all but one drive, but the capacity of your entire pool is limited by your single-drive capacity.
RAID 10: Same as RAID 1, but with the addition of striping.
RAID 5: If there are at least 3 disks, then any one disk can be lost without causing data loss.
RAID vs ZFS
ZFS is a filesystem (like EXT4 or NTFS) that is popular for use with larger storage pools (like your NAS!) due to its support for RAID. In fact, ZFS comes with its own implementation known as RAID-Z. You'll see ZFS configurations being used, sometimes interchangeably with standard RAID configurations in online forums, so it's good to know how they are equivalent.
Striped (RAID-Z0) is functionally equivalent to RAID 0 (no redundancy).
Mirrored is functionally equivalent to RAID 10, and duplicates your data by the number of drives you have.
RAID-Z or RAID-Z1 is functionally equivalent to RAID 5.
RAID-Z2 is functionally equivalent to RAID 6 and can survive any two disk failures.
Mirrored pools are most popular for small (2-3 drive) setups, and RAID-Z2 is most popular for larger pools.
RAID Is Not Backup
You'll hear these four words if you talk to literally any sysadmin around, and for good reason. Although a proper RAID setup will protect against hard drive failure, you're still storing all of your data in one physical location! If your server ever gets stolen/destroyed or goes offline for some other reason, you won't be able to access any of your data.
We'll cover proper backup solutions in the next part.
So what disks should I get???
HDD vs SSD
This is largely a matter of cost: although SSD's are better than HDD's in most aspects (speed, reliability/lifespan, power consumption...), they get prohibitively expensive once you reach the 10+ TB range. As such, almost all homelabbers primarily use hard drives for their NAS setups.
However, it's also possible to run multiple pools- a SSD-based "fast" pool for frequently used storage, and a larger HDD-based "slow" pool for archival storage.
While it is theoretically possible to create some kind of caching setup to have one accelerated pool of both HDD's and SSD's, this is very uncommon in practice and will take some significant messing around to get it to work. As such, I would not recommend this approach.
Number of Drives
Since using anything other than RAID 0 will eat away at your raw disk capacity, you'll need to get more raw storage than you actually need.
Calculating this manually gets really tricky, but luckily there are plenty of resources online to figure out the optimal configuration for your desired pool capacity and level of redundancy.
Here are a couple of calculators to play around with and bookmark for future use. They'll ask for some parameters we have yet to discuss, and you probably don't know exactly what software you're using just yet- so keep them handy on the side for now!
SMR vs CMR
If you dig around the spec sheets for the hard drive you're thinking of buying, you'll come across either the term "CMR" or "SMR".
These stand for "Conventional Magnetic Recording" and "Shingled Magnetic Recording" respectively. Like the name suggests, the differentiating factor is how data is stored on the disk: data bands on an SMR disk overlap like shingles on a roof, while CMR data does not overlap.

For example, here's the Amazon listing for the WD Red Plus, which specifies that it is a CMR drive in the title:
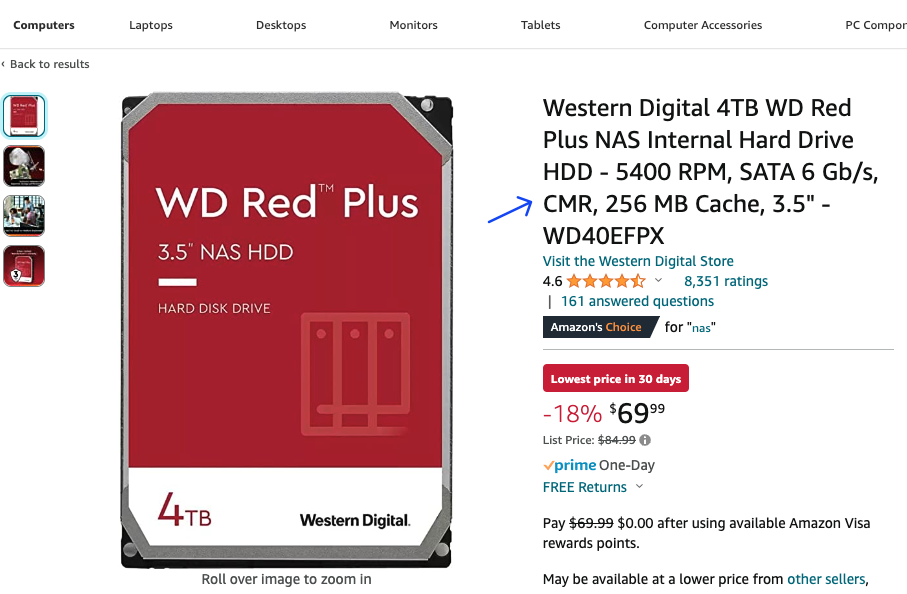
Due to their physical nature, CMR drives tend to be faster and more reliable than SMR drives, but are also more expensive (not by a whole lot though). Unless you're really strapped for cash, it's almost always worth it to spend the extra $10 or so to buy a CMR drive- so double check the listing before you buy!
Some recommendations for industry-standard CMR drives include:
WD Red Plus (Not the standard WD Red- those are SMR)
Seagate IronWolf Pro
Toshiba N300
Rotation Speed
Nearly all hard drives these days will either be 5400RPM or 7200RPM. The main tradeoffs for this decision are speed over power consumption, noise, and longevity. Additionally, 7200RPM drives take longer to spin up, which means they may be less optimal if you're planning on only grabbing a few files from your NAS every now and then.
There are plenty of debates on the Internet about which one is better, but both are perfectly acceptable. But if you don't care too much about a little bit of extra read/write performance, going with 5400RPM is a safe default choice.
New vs Refurbished
Buying refurbished drives can save you a lot of money- but given the limited lifespans of hard drives, it's good to be wary of used drives that might be close to dying.
If you're not concerned about price at all, definitely just buy a new hard drive- you'll get several years of manufacturer warranty and can easily RMA the drive if it's defective or fails sooner than expected.
Otherwise, you can find some really nice deals on sites like ServerPartDeals- for example, a manufacturer refurbished 18TB Exos is going for $175 at the time of writing- over $100 off its new price, and even cheaper than a new 10TB CMR drive. Note that you'll have to do some more extensive research about the warranties of these drives, which are usually much shorter (several months to a year at most) and come with additional terms that make them much more difficult to RMA compared to new drives.
A note on shucking
You might have heard of the term "shucking" before- this refers to the act of taking apart external hard drive enclosures to get the drive inside them due to external enclosures often being sold for far cheaper than the standalone drive.
If it's holiday season and you spot some WD EasyBooks being sold for $100 off, go for it! Shucking is easier than you might think and very commonly practiced. It's even possible to maintain your warranty if you are extra careful about it (though this is a legal gray area and definitely not guaranteed).
Here's a guide from iFixIt in case you don't already have a guide handy from Reddit or another forum.
Choosing NAS Software
Now that you have some idea of the hardware that you'll be using, it's time to pick out NAS software!
TrueNAS
TrueNAS is fully free and open source, and my personal choice for NAS software. It requires some additional configuration compared to the other choices, but has pretty much everything you need. I'll be demonstrating how to set up TrueNAS for the remainder of this guide.
TrueNAS is based on FreeBSD and uses ZFS- so while it's still UNIX-based, it won't work exactly like you might expect for a standard Linux distro.
UnRAID
UnRAID is probably the most popular proprietary NAS software solution out there. You're mostly paying for a more polished experience compared to the other choices, as well as some cool features like great hotswap support, Docker container management, and caching. It's also not horribly expensive (starting at $59, or $129 if you want unlimited drives). I'd personally recommend trying out TrueNAS first, and switching over to UnRAID if you find that it has features you are willing to pay more for.
UnRAID uses its own filesystem, which is generally regarded as less robust compared to ZFS. However, it's perfectly acceptable (and probably still slightly overkill) for our homelab use case.
Synology/Xpenology
Synology is one of the most popular NAS enclosure companies. If you are looking for a plug-and-play solution with minimal configuration, consider getting one of their enclosures. The main drawback is their price- expect to pay $400 or more for a respectable configuration with more than 2 drive bays.
If you're down for some mild violation of terms of service, the Xpenology project allows you to self-host Synology NAS software on your own hardware. I don't have any experience doing this, but it might be worth a try if you're looking for the polish of a Synology device but without the cost of one.
Setting up your NAS in a VM
Generally, the recommended configuration for a NAS is to host it on its own dedicated machine, whether that be an integrated solution like Synology's offerings or one that you build yourself.
However, if you do it properly, hosting your NAS software within a VM in your server can work just as well, and save you the cost and hassle of needing multiple physical servers. This is a great starting point, and one that lends itself to an easy upgrade if/when you decide to expand your setup.
I'll go over how you can host your NAS in a Proxmox VM here. If you choose to run it on dedicated hardware instead, install your chosen software plus ZeroTier, then skip this section and the HDD Passthrough section.
Setting up a TrueNAS VM
First, get the TrueNAS image at https://download.freenas.org/13.0/STABLE/U5.1/x64/TrueNAS-13.0-U5.1.iso (may be different if later versions have been released- see here for the latest version). Remember to download it into the var/lib/vz/template/iso folder in Proxmox via curl or wget so it shows up in the console!
Next, create a new VM in Proxmox (see here for a refresher), using the image you downloaded. TrueNAS uses RAM as a cache, so make sure to allocate enough memory. Although some forum posts suggest a "1GB of RAM per 1TB storage rule", the accuracy of such a rule is rather debatable. Going off of official specs, 8GB is the absolute minimum with 16GB recommended. If you have a large amount of storage or plan on using deduplication, you should allocate more RAM accordingly (perhaps 32GB for anything more than 50ish TB).
One consideration to make when allocating resources for your VM is whether you will be running media server applications like Plex or Jellyfin. If you are, you should allocate additional CPUs, memory, and storage to be able to run these applications. Otherwise, a minimal configuration like 1-2 CPU cores and 16GB boot disk storage should be enough to get you started.
For the juicy hardware spec details, refer to the official documentation.
HDD Passthrough
In order to work properly, your NAS software must have full control over the hard drives that will be used to create a pool-- using virtual drives as you do for any other VM will not work! There are several methods for hard drive passthrough, which you are welcome to compare and choose between for your specific use case.
Method 1: HBA Card
If your chassis has enough space to hold multiple hard drives, you can adapt them to PCIe and pass through the card directly to your NAS. The PCIe card that allows you to do this is an HBA (host bus adapter).
For this method, you will need to purchase the following:
LSI SAS HBA card in IT Mode (example models include 9211-8i, 9300-16i). Each SAS port can drive up to 4 hard drives, so getting a 2-port/8i card is probably more than enough.
SAS to SATA adapter cables, if your card does not come with them
You can acquire the above used via eBay starting from around $40 total at the time of writing.
Do not buy a direct PCIe-SATA expansion card- these are not designed for the workloads our NAS will require (i.e. prolonged read/write over all disks simultaneously).
RAID cards are also not necessary, since your software can perform all of the RAID calculations without additional hardware.
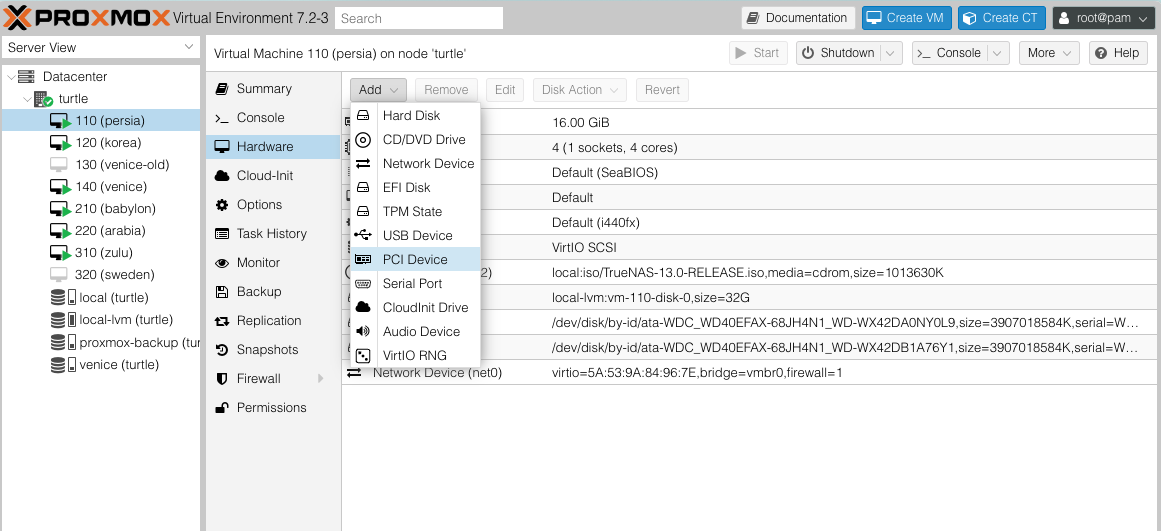
Once you've acquired your HBA card, plugged it into any available PCIe slot, and hooked up your drives to it, you can now pass it into Proxmox! You can do this by selecting your VM, going to the Hardware tab, then clicking Add -> PCI Device and selecting your HBA card from the list.
Method 2: External Enclosure
If your server can't hold enough drives in it (or you're using something like a Raspberry Pi), getting an external enclosure might be your best bet. Companies like U-NAS offer hard drive enclosures that you can plug into your server.
Passing an enclosure into your VM is the same process as passing through an HBA card, except that the enclosure may be connected over USB versus PCI. You can click on Add -> USB Device and select the correct option instead.
Method 3: Proxmox Passthrough
If you really can't afford a HBA card or external enclosure, you can connect your hard drives as you normally would (onto your motherboard's SATA ports) and pass them through individually. This method is not recommended because it adds an additional layer between your NAS and hard drives, which makes data loss more likely to occur.
If you understand the implications and would still like to proceed, open up your Proxmox shell and do the following:
- Run
lsblk -o MODEL,SERIAL. This should output a list of the model and serial numbers for all detected drives.
Run
ls /dev/disk/by-idand cross-reference thelsblkoutput from above to identify the disks we want to pass through. For example, the serial numberWD-WX42AD0WV0L0could correspond to the disk IData-WDC_WD40EFAX-68JH4N1_WD-WX42AD0WV0L0.Run
qm set <VM_ID> -scsi<N> /dev/disk/by-id/<DISK_ID>whereVM_IDis the ID of the TrueNAS VM,Nis an integer that hasn't been assigned a disk yet (e.g. ifscsi1exists, use-scsi2to add a new disk), andDISK_IDis taken from the output ofls /dev/disk/by-id.Edit the file
/etc/pve/qemu-server/<ID>.confto addserial=<SERIAL_NUMBER>to the end of each of the newscsi<N>lines.Repeat the above steps for any other drives you would like to add.
Set up a Pool
Now that your hard drives are detectable by TrueNAS, it's time to set up your pool!
First, let's make sure we can access the TrueNAS web UI. Open the Proxmox console for the VM and you should be greeted by the following prompt:

The web interface IP listed is probably your LAN address. Let's install ZeroTier to make sure you can access it anywhere- here is a good guide on how you can do this (it's a little different due to TrueNAS being BSD-based rather than Linux-based).
You can proceed to set up your DNS records and reverse proxy for more human-friendly access if you would like- but remember that this console should only be accessible via your internal network.
Once you can access the web console, navigate to Storage -> Pools -> Add. You should be greeted with the following screen:
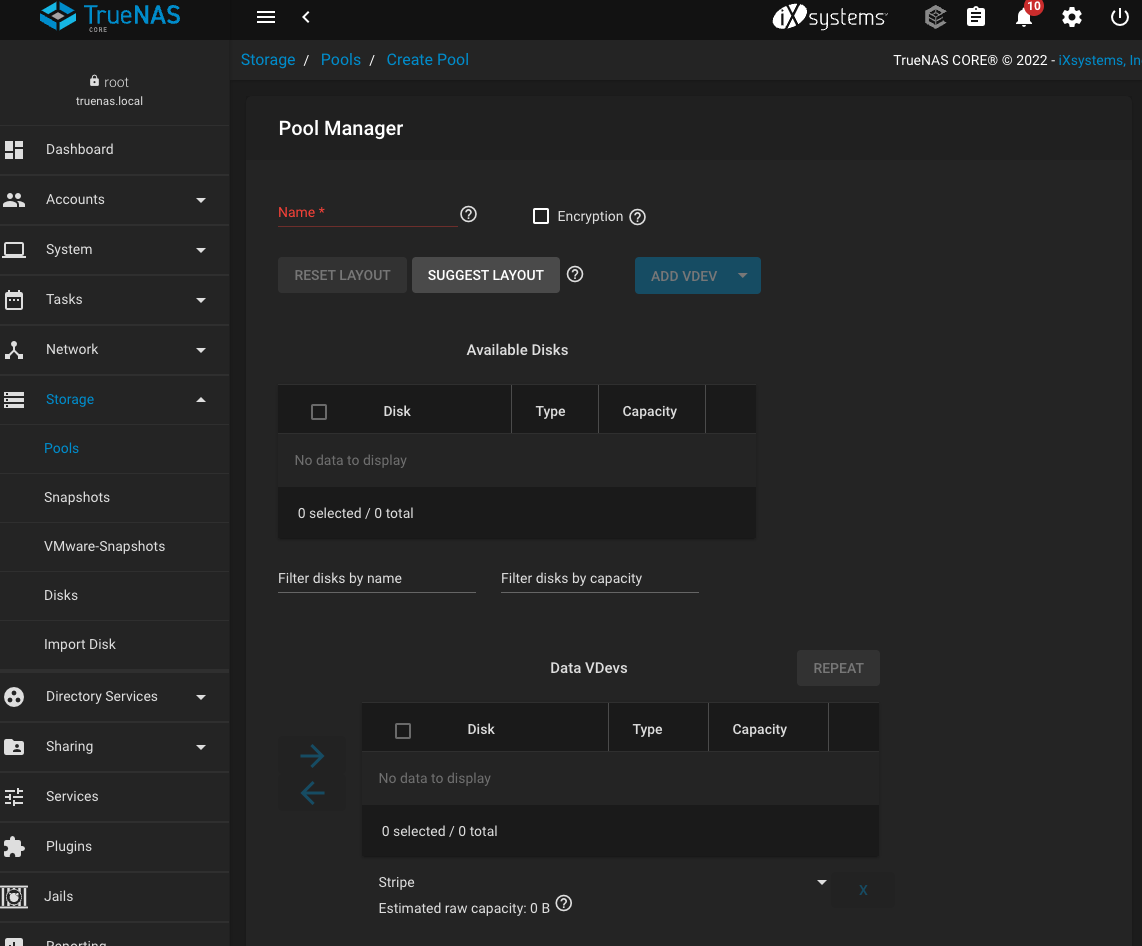
There's a lot of terminology here (what's a VDev?? How is this different from pools???). You should consult the FreeNAS Guide for a comprehensive introduction if you would like. Here's the summary:
A VDev is a "virtual device", or a collection of physical drives organized via software RAID. Once a VDev is created, you cannot add or remove drives from it!
A pool (or ZPool) is a collection of VDevs. This is what will be available when your other VM's/devices connect to the NAS to access data.
If any one vdev fails in a pool, then the entire pool fails. So make sure you configure your vdevs in a robust manner, using ZFS RAID configurations, such that you can handle drive failure.
If you're unsure of what to do here, just make one VDev with all of your available drives using the suggested layout (mirror for 2 drives, RAID-Z1/Z2 for 3+ drives).
Once the pool has been created, TrueNAS will automatically prepare your drives and make the pool available! You should be able to see this pool within your TrueNAS instance at the location mnt/POOLNAME/.
Sharing
There are a variety of ways you can access your new pool from other devices. You can also restrict certain users or devices to a subfolder in your pool (known as a dataset).
Permissions
First, let's set up some basic permissions to allow yourself and others to access the pool.
If you want to restrict a user to a subfolder, let's first create a new dataset. You can do this from the terminal (click on Shell from the TrueNAS sidebar):
Make sure the folder exists:
mkdir -p /mnt/POOLNAME/FOLDERNAMECreate the dataset:
zfs create POOLNAME/FOLDERNAME
Then, let's create the user from the Accounts -> Users screen. You can assign whatever username and password you want- this is what the user will type in when attempting to connect. There should be no need to adjust any other settings besides reassigning the home directory to your dataset if needed.
NFS (Linux)
To connect from a Linux device (or another one of your VM's), you will need to set up a NFS share.
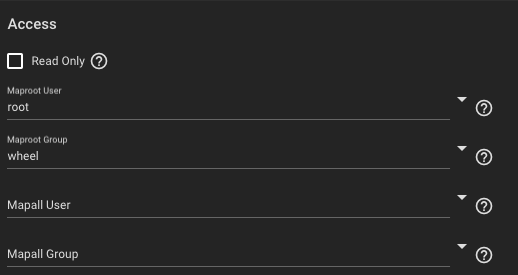
Go to Sharing -> Unix Shares (NFS), and select the dataset you wish to share. If you want to share the entire pool, additionally go to the Advanced Options and configure the Access section as follows. This will ensure you will connect as the root user and be able to read/write.
You can also configure the authorized networks (also in the advanced settings) to restrict all connections to come from your ZeroTier subnet if desired. If you're unsure of what to enter, refer back to the ZeroTier web console and copy over the subnet and subnet mask fields.
Now, on your Linux machine, mount your pool by doing the following:
Install the NFS package:
sudo apt install nfs-commonCreate a local mount point:
sudo mkdir -p /mnt/DIRECTORYNAMEHERERun the mount command:
sudo mount -t nfs ZEROTIER_IP_OF_NAS:/mnt/POOLNAME/FOLDERNAME /mnt/DIRECTORYNAMEHEREAllow your regular user access to the mounted folder:
sudo chown USERNAME /mnt/DIRECTORYNAMEHEREIf you want the mount to persist on reboot, add a line to
/etc/fstab:ZEROTIER_IP_OF_NAS:/mnt/POOLNAME/FOLDERNAME /mnt/DIRECTORYNAMEHERE nfs defaults 0 0
SMB (Mac and Windows)
To connect from a Mac or Windows machine, we can use the SMB protocol for more convenient access.
This should work out of the box on TrueNAS: go to Sharing -> Windows Shares (SMB), then follow the steps to add a new share with the default parameters.
On your Windows machine, open Windows Explorer. In the file name bar, type in //ZEROTIER_IP_OF_NAS/POOLNAME/FOLDERNAME and you should be prompted to log in. You should use the credentials of the user you made in TrueNAS, and not your Windows login. Once the connection is successful, you can bookmark the location to save your NAS folder to quick access.
On your Mac machine, open Finder. Then, navigate to Go -> Connect to Server... For the server address, type in smb://ZEROTIER_IP_OF_NAS/POOLNAME/FOLDERNAME. Use the login you created in TrueNAS. Once you're connected, your NAS should show up as a network drive on the Finder sidebar.