TurtleNet 1: Setup, and The Big Picture
Enough with the intro fluff- let's jump right into it!
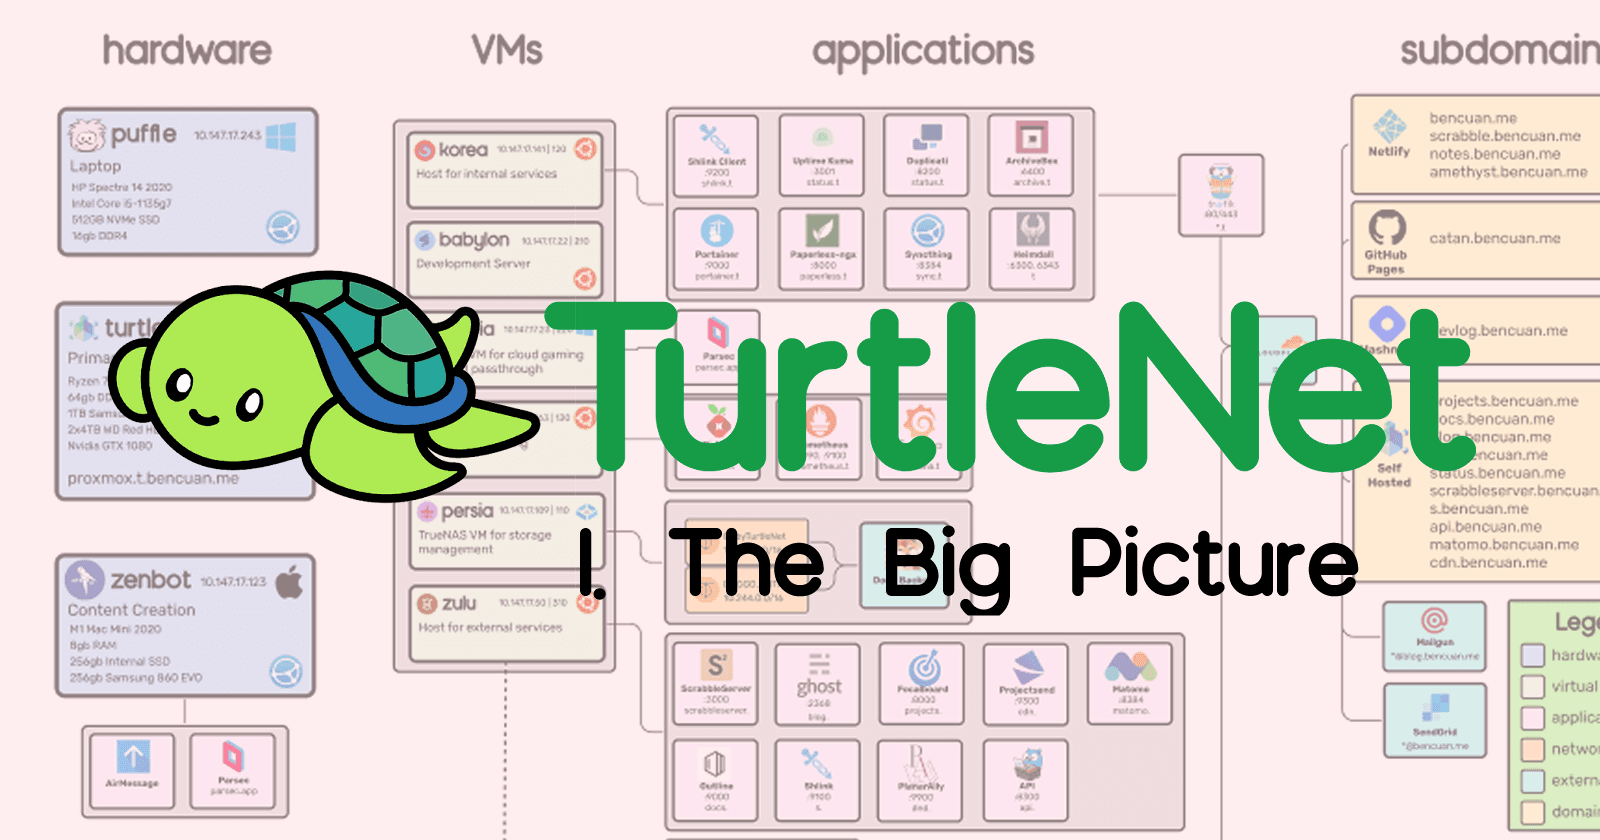
Here's the architecture diagram from the last article. I'll walk through what each part means, and how it'll correspond to stuff we have to set up. (Click here for a bigger version!)
The purpose of this particular article is to give a very high-level overview of the components in my setup, such that someone already familiar with how and why we need each part can see which solutions I chose.
If you're not sure what most of these things are, that's alright! I'll break down each step in future parts.
A Summary of the Summary
Here's the super short 30 second version of this already heavily condensed article for all the busy people out there!
A homelab refers to a server whose hardware is fully controlled by the person hosting it, and lives in a non-commercial environment like a home or school.
Using server hardware (which is basically just another computer), we can run software like Proxmox to manage virtual machines (VMs), which are full operating systems run within the server.
VM's allow us to host a variety of services using the same hardware, even if they have different requirements.
To allow my VM's to talk to each other (and to host private services that only I and trusted users can connect to), I use ZeroTier, which is a software-defined networking solution that simulates a network switch online.
Then, to allow others to access my public services, I run a reverse proxy on an externally-hosted VM with a public IP address to redirect all requests to their internal locations without exposing where they really are. I then create DNS records to map friendly domain names (like blog.bencuan.me) to that public IP address.
The Hardware

Here's my physical server! As you can see, it's basically just a modern mid-range consumer desktop.
Interested in building your own computer for the specific purpose of homelabbing? Jump to Part 1.5 for a guide explaining why I chose those particular parts.
Why did I use consumer parts?
It's generally more popular for established homelabbers to build a full rack-mount setup using enterprise hardware, since that's the kind of stuff that's designed to be running as a server.
However, for newer homelabbers and those who don't need as much performance, I believe that using consumer hardware is generally a better choice for the following reasons:
Price and availability: Unless you're good at finding when companies are throwing out their old hardware and nabbing it, consumer parts are way easier to obtain. You can buy consumer parts for a reasonable price pretty much anywhere (Amazon, Best Buy, Newegg, etc). My setup cost slightly over $1000, which is about what you'd spend on a desktop anyways.
Noise: Consumer hardware is way quieter, which is a huge plus if you're running it in your house and don't want to annoy everyone in a 500-foot radius of your server.
Electricity usage: Unless you're running some crazy setup, consumer hardware shouldn't bring up your electricity bill by that much (after all, you're just running a second computer in the house). My particular setup runs at 80W for most of the time (equivalent to a handful of bright LED lightbulbs). On the other hand, rack setups can easily draw hundreds to thousands of watts, since they're optimized for performance rather than electricity usage.
Alternatives
As I've mentioned a couple times previously, my setup of a purpose-built consumer PC is only one possible way to start a homelab! Here are a few others, and some notes about them:
Using an old desktop/laptop or Raspberry Pi: This is the most economical choice, and gives you more than enough power to get started! If you're only running simple web servers or a handful of Docker containers, this might be all you need. However, if you expect to outgrow it soon, it might be better just to go for it and purchase the parts for a new one.
Using a cloud provider: If you just want to get the hang of configuring server software or run a simple service purely for its utility, homelabbing may not be for you just yet! You can purchase a VM from a provider like DigitalOcean, AWS EC2, Oracle Cloud, or Linode, which will serve the same purpose of a self-hosted VM but without having control over the hardware that runs it. Typically, these VM's are billed monthly, but for low usages many providers offer a free tier.
Using enterprise hardware: If you have a serious need for powerful hardware or want to take the hobby to the next level, building your own rack is the ultimate homelab setup. If you're curious, you can search YouTube for "homelab rack" to get a variety of examples of all shapes and sizes.
Networking

When you imagine a server in a datacenter, one of the first images that comes to mind is probably the rows upon rows of networking cables:

Luckily, that isn't necessary when I only have one physical machine! Once that one machine is hooked up to the router, that's really all I need for now. In the future, I might run my own router software and need a switch, but that isn't happening anytime soon.
There's been a recent wave of software defined networking (SDN) solutions, which create virtual networks and use software, rather than hardware switches, to manage connections between machines in a network.
The particular solution I went with was ZeroTier, which assigns IP addresses to every machine connected to the network that can only be resolved by machines also connected to the network. (Don't worry about the fact that my diagram is full of IP addresses- they're all completely inaccessible to the public!)
Since I still have public services, I need some way to allow access in without having every stranger connect to my ZeroTier network. So, I have one (free) Oracle Cloud VM that's assigned a public IPv4 address while connected to ZeroTier. Its only job is to run a reverse proxy which allows public access to only the particular resources I want to expose- more on that later.
Another software-based alternative to ZeroTier is to run a VPN, such as OpenVPN or Wireguard. From a security standpoint all of these solutions are relatively similar, but running a VPN requires forwarding a port, and you'll be unable to connect to the network if the host machine is down.
Virtual Machines
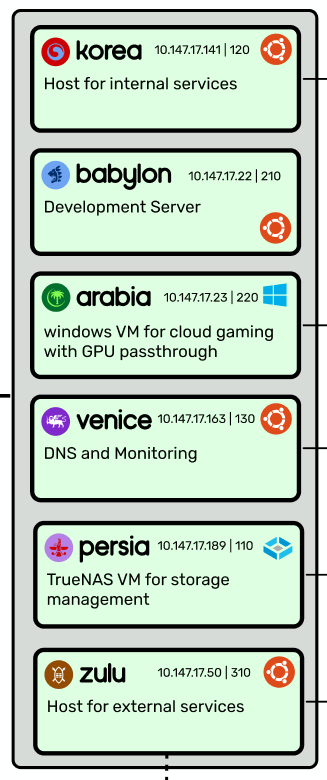
Besides the Oracle Cloud ingress, I currently host six VM's on my main server, using Proxmox as a hypervisor:
Korea hosts all of my internal services (which are only accessible to machines within my ZeroTier network).
Babylon is my development server, where I write most of my code and can quickly spin up live web servers if needed.
Arabia is my gaming VM. It has 6 cores, 20GB of RAM, 500GB of SSD storage, and a GTX 1080 assigned to it, so it's quite capable! I connect to it via Parsec, which has unbelievably low latency.
Venice is where I host my DNS server (Pihole) and monitoring suite (Prometheus and Grafana). This could have easily been absorbed into Korea, but I decided to keep it separate for futureproofing purposes (such as if I were to duplicate Pihole and load-balance it for redundancy, or add a VPN server to it).
Persia is my TrueNAS instance, which manages the hard drives which are passed into it. All of the other VM's and physical machines in the network can access its pool like any other network drive (using NFS, Windows SMB, etc).
Zulu hosts all of my external services, which are publicly accessible via some subdomain of bencuan.me.
With the exception of Arabia and Persia (which run Windows and TrueNAS Core respectively) all of the VM's above run Ubuntu 22.04. I chose Ubuntu since it works right out of the box-- also, I learned pretty quickly that while building servers, you want your core infrastructure to be as boring as possible. There's no correct distro choice, as long as you choose one that's reliable and familiar to you.
Applications
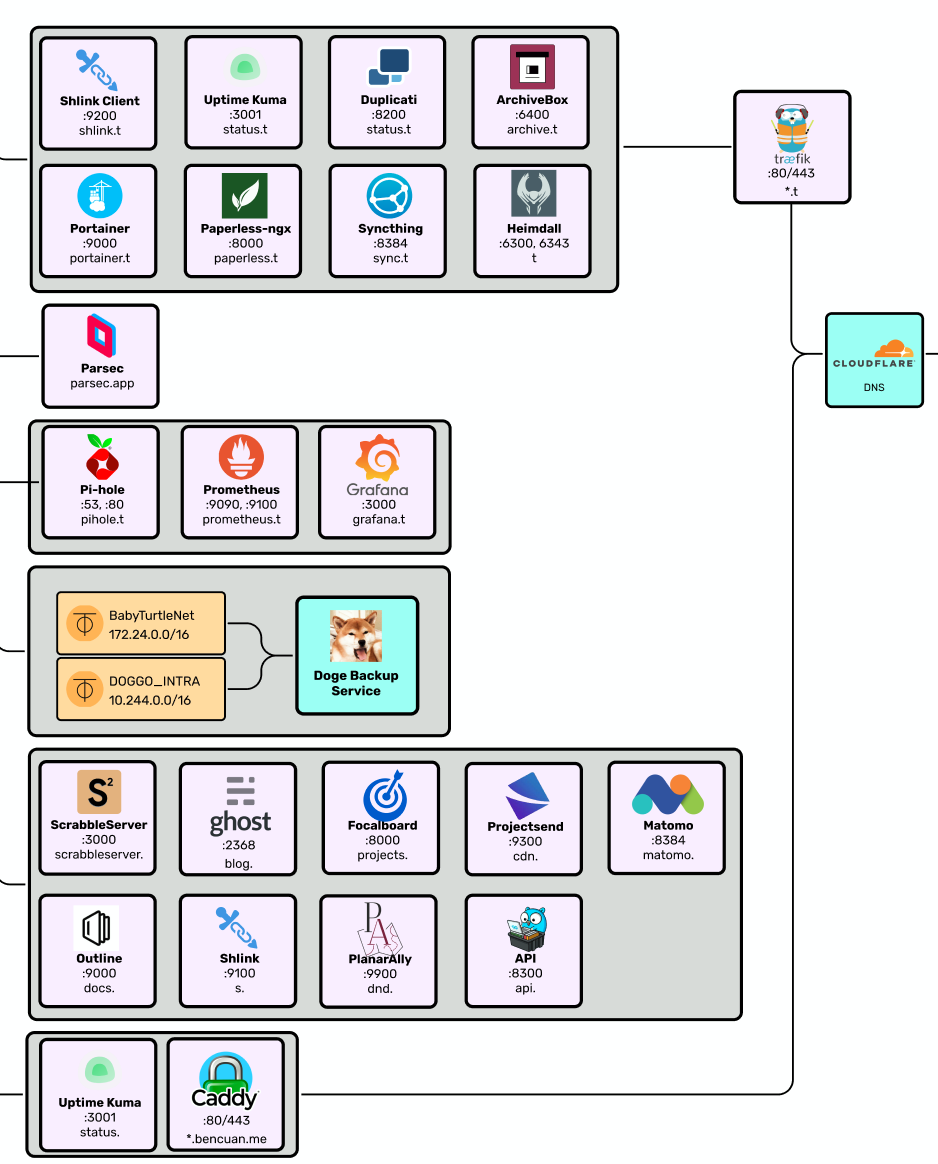
Now for the fun part! Here's all the stuff that actually lives on my setup. Future parts will go into far more detail about how you can set these things up for yourself. There's plenty more you can do with your own that I don't, but hopefully this gives you a taste of the power of homelabbing:
Reverse proxies: Caddy and Traefik. I use Caddy to reverse proxy external services, and Traefik to reverse proxy internal services. (Reverse proxying is basically mapping domains to local IP's and ports-- again, more on what this means exactly in a future part.) The reason why I have two is because I can point the wildcard domain
*.t.bencuan.meto my internal server (where Traefik is), and point all my public subdomains to the public IP of my Oracle VM (where Caddy is), making it impossible for general users to have any access to internal services whatsoever.Docker: I use docker-compose and Portainer to manage Docker, which is how I containerize and persist services such that multiple services can be easily run within the same VM.
Backup: Duplicati and Syncthing allow duplication of my most important data onto other devices like my laptop and a friend's server, so it can be restored in case my server blows up.
Monitoring: Prometheus and Grafana collect and aggregate data about metrics like disk/CPU/RAM usage. Uptime Kuma provides a nice-looking status page to let users (and myself) know if something isn't working.
Documentation: Focalboard and Outline provide some platforms to host private documentation.
Blogging: Ghost provides a self-hosted Medium alternative that powers my blog (blog.bencuan.me).
Analytics: Matomo is a self-hosted version of Google Analytics. Self hosting allows me to fully own the data I collect, and ensure that I'm respecting the privacy of users while still gaining helpful insights about what people are looking at.
API: I have a custom API written in Go, which allows me to host custom endpoints to serve things to my various websites when needed. The main feature I use this for is to enable the applause button on my blog.
Shorturls: Shlink is a self-hosted version of Tinyurl that allows me to create aliases starting in
s.bencuan.me- this is pretty helpful for sharing links.Content delivery: Projectsend provides a way for me to host and share files with others. I mainly use this to deliver proprietary fonts to Netlify during the build process.
Archival: Paperless allows me to archive scans of physical documents, and ArchiveBox is like a self-hosted Internet Archive that allows me to save webpages locally in case they go down in the future.
Dashboard: Heimdall provides me with a cool new tab page to hold links to all of the above services and some frequently used external services.
Subdomains
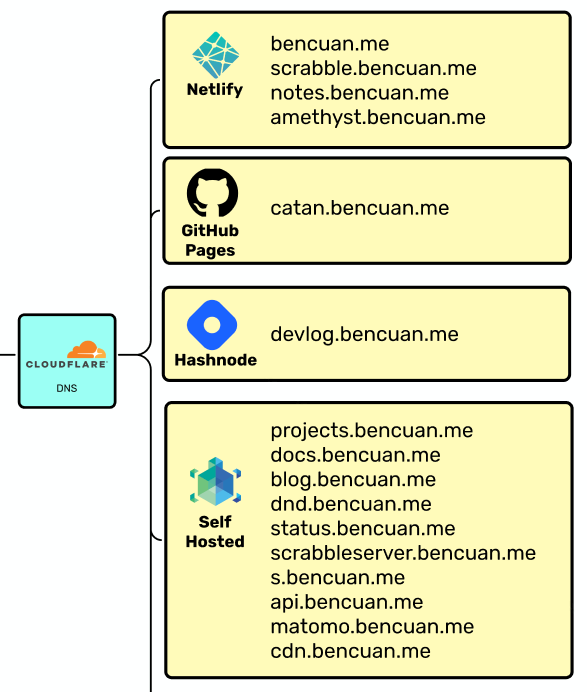
After hosting them, I need a way for users to easily access my external services. I happen to use Cloudflare as a DNS provider, but it really doesn't matter which one you use.
For all of the domains listed in the "Self Hosted" box, I have an A record mapping the domain name to my ingress server's public IP address. The Caddy instance hosted there then routes users to the desired resource.
My static sites are mostly hosted on Netlify, since I need the additional power over other solutions like GItHub Pages to configure builds and custom environments. If you're really into self-hosting everything, you could try to find a self-hosted CI/CD solution for static site hosting, but I didn't find it worth the effort for me since doing so would probably have a poorer user experience compared to Netlify.